AV Stand Cobbling

PJPro

New member
Jan 21, 2008
274
0
0
Visit site
I need an AV stand. I thought I'd buy something and then read the threads by Ray Palmer. What the hell, I'll make one. Don't get me wrong. I know that there isn't the technical challenge of Ray's threads but nonetheless it will not be without difficulties. So, In this thread I'll document the steps taken from design through to completion of the stand. More to follow.....
 
A

Anonymous

Guest
Will this be a Plywood or solid timber affair?I can recccomend some good wood glue too!
 
A

Anonymous

Guest
If you're going to be gluing some of the joints to re-inforce them then I suggest using a glue called "Titebond". I used to use this in my failed attempt to become a luthier aand although I failed all the bits I stucck together are still holding together!Very high tack and aggressive nite though so it's a great glue.
 

PJPro

New member
Jan 21, 2008
274
0
0
Visit site
OK. Time for an update!
I wanted something heavy in wood. Looked around at the options but nothing really fitted what I wanted (in terms of design) or my budget.
So, I drew out a design
oak2.jpg

These turn out to be a little on the expensive side....and I didin't know if my design would actually work. The key concern for me was the width of the unsupported span.
As a cheaper alternative, I decided to go for some of this

This is 40x70mm softwood. Fabricating the board from this timber is a little daunting and I have never done it before. But it can't be that hard, can it?
More updates to follow.....
 
A

Anonymous

Guest
Cool!If you get stuck I'm sure Vanman would be willing to help out....then again possibly not.
 

SpiceWeasel

New member
Apr 10, 2008
189
0
0
Visit site
You could always go the Blue Peter route and stick it together with a bit of sticky back plastic
emotion-2.gif
. Or for the full on effect you would also have to use toilet rolls and the odd empty washing up liquid bottle.

Seriously though good luck with your project
 

PJPro

New member
Jan 21, 2008
274
0
0
Visit site
OK, long overdue update and I've forgotten the associated narrative I was planning to use to support the photos. Still, here goes.....

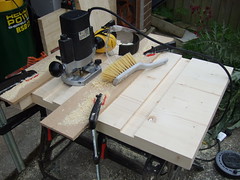
I bought a shed load of 4x2 planned timber and some 1/4" plywood from B&Q. What I needed to do was cut all the 4x2 to length and join all the 4x2 together to form the sides, top and shelves. I wanted a strong joint, so decided to route a small slot in the side of each length of 4x2 and use the a 1/4" plywood fillet to strengthen the joint.

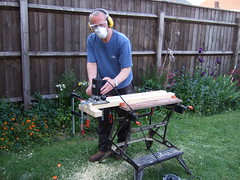
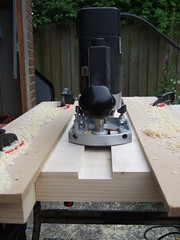
Routing the lengths of 4x2 to introduce the slot for the fillet.
2830800791_be4949d21c_m.jpg


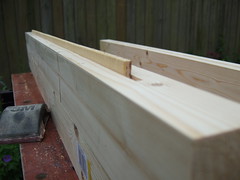
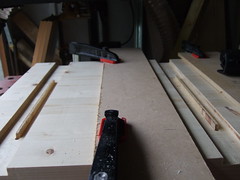
A part glued shelf showing the plywood strengthening fillet. The fillets were ripped down from a sheet of plywood using a bandsaw.
2831631848_e4c117891f_m.jpg


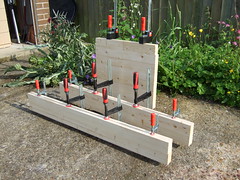
The slotted 4x2 complete with plywood fillets then needed to be glued and clamped. I glued three lengths together at a time, slowly building up the sides, top and shelves. I used Bessey clamps....expensive but just about the best you can get. You need a lot of clamps!
2830783313_38e8c77731_m.jpg


I then routed the sides to accept the shelves and the top to accept the sides (not shown).
2830787365_c404884f1e_m.jpg

2830785917_3afb781363_m.jpg


I then routed a further slot to fit in a plywood fillet to strenghten the joint between the sides and the shelves and the sides and the top (not shown).
2831619502_7b79c52e4a_m.jpg


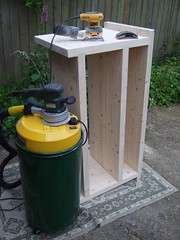
I then glued the sides, shelves and top together and sanded the whole lot down. If you're in the market for a orbital sanded I can highly recommend the metabo duo and DM Tools as a supplier of all DIY tools.
2830795881_cfec24ceae_m.jpg


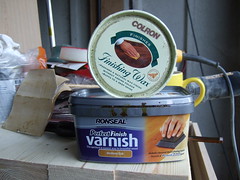
Next was the finishing. I agonised over this. In my experience, this is where it all goes wrong. I finally went for this stuff.
2830794415_76de496d74_m.jpg


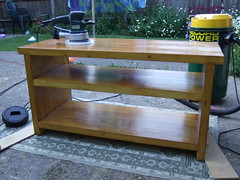
I then applied the finshing products to the stand, giving it a couple of coats and then giving it a good polish and that's the finished stand!
2830791617_bf0cf25492_m.jpg


This thing is immensely strong and heavier than the average stand. The stats are...

ComponentLength of 4x2 (mm)Estimated Weight (Kg)
Top82608.26
Sides75767.58
Shelves1218012.18
Total2801628.02

Note: I estimated the weight by weighing a short length of 4x2 and established that the timber weighs approximately 1g per mm.

I have to say I am quite pleased with the results but it was a fair amount of work. It ended up costing about a ton.

Not sure I like the colour much. It's supposed to be light oak but it has the inevitable orangey look about it. Still, this is a temporary stand.

In the near future, now that I have validated the design, I will use oak kitchen worktops instead. Expensive, but I won't have to fabricate the board.
 

PJPro

New member
Jan 21, 2008
274
0
0
Visit site
From another thread, but refering to this one...
harveymt:
That is essentially what I would want to do. Only I would it split into thirds. The middle one left with no shelf to leave plenty of room for the amp. The spaces to the side would be split into two with shelves.

You could do that.....but there is masses of space for my Onkyo 606 on the bottom shelf with about 5 inches of headroom.....and your proposal complicates the build.

harveymt:
Does the solid shelf allow heat away effectively? Could you drill some holes in the shelf or if you have enough room around the side and top of the equipment it shouldn't be an issue?

Yes, I rely on the headroom to allow the passage of air for cooling. Also the shelf doesn't go all the way to the back which allows for air currents (and wires).

harveymt:
Did you not choose oak only due to the cost?

Yes. And I wanted to dersik the build. At some point in the near(ish) future I will build another using oak kitchen worktops.

harveymt:
Could you put some doors on it? Would a remote signal from a Harmony One go through glass? Or on thinking about it I could get an IR repeater/extender and have the receiver of it put somewhere discreetly on the rack.

I'll try and draw up what I mean and post it. I've been meaning to learn how to do photographs for a while so now's as good a time as any.

Yes, you could put doors on it, but again, this complicates the build and prevents the circulation of air.

I think next time I will effectively saw the sides in half and place spikes on the bottom of each, allowing each shelf to be isolated from each other. A design enhancement with minimal additional complexity.
 

michael hoy

Well-known member
I built my AV cabinet myself, made from 19mm Maple veneered mdf.

Doubled up the thickness for the middle and top, finished the bare edges of with 19mm solid Maple.

Cost me £600 in material, I could not find a ready made one to fit below £1500.

Well worth having ago.
 
A

Anonymous

Guest
Well done PJ, it,s a good feeling when you have designed and manufactured it yourself isn,t it.
emotion-21.gif
The only changes i would have done would have been to router the end slots at least twice as deep as you have done, you may find in time that the middle shelf bows in the centre, also if you are looking for a strong lifetime bond then you should use Cascamite glue, just a couple of suggestions but once again well done, oh by the way when staining a soft wood that has been dressed the rule of thumb is less is best, start off applying a very small thin amount and gradually build up until you have the colour you are happy with.
 

PJPro

New member
Jan 21, 2008
274
0
0
Visit site
Thanks for the tips johnnyjazz. I'm not sure about the end slots...maybe a bit deeper? That said, there's absolutely no sign of bowing. The horizontals are just too thick for the span to bow unless they were severely over loaded.

What I have noticed is a small degree of shrinkage, so the joints are no longer absolutely perfect. I guess this is due to using poorly dried, kiln dried softwood and I'm sure the kitchen worktop would get around the problem. Actually, I was looking with interest at kitchen worktops today. It'd be cool to use granite. Not sure about the best method of fixing granite together. Hmm. Further investigations required.
 

TRENDING THREADS

Latest posts